Have you ever walked into a boutique, spotted a $90 wooden tree with a tiny price tag, and thought, “I could make that with the scraps in my garage”? You can. Wooden Christmas decor has that warm, cabin-in-the-mountains look people pay a lot for, and most of it costs pennies when you make it yourself.
I’ve spent more holiday seasons covered in sawdust than I’d like to admit, and I’ve learned that wood looks expensive because it’s natural, textured, and a little imperfect. If you lean into that, you don’t need a big budget. Grab your sandpaper and we’ll start with the easiest project.
1. Rustic wood slice ornaments

Wood slice ornaments are the gateway drug of wooden Christmas decor. Cut a fallen branch into ¼-inch rounds, drill a small hole near the top of each one, and thread some jute twine through it. Hang a dozen of these and your tree starts to look like it belongs in a Scandinavian design magazine.
How to keep your slices from cracking
Fresh wood holds moisture, and that moisture splits the slices as they dry. Most crafters bake their slices at around 200°F for 1 to 2 hours, flip them halfway through, and then let them air dry for a few more days. Once they’ve dried, brush on a clear matte sealer.
- They cost you basically nothing if you collect branches after a storm.
- For an upgrade, wood burn initials or a simple snowflake onto each slice.
- Birch slices look the fanciest because of that white bark.
2. Stacked scrap wood tabletop trees

Do you have leftover 2x4s or furring strips? Cut them into graduated lengths, stack them from longest to shortest on a dowel, and you have a modern tabletop Christmas tree. I like to make a few in different heights and cluster them on a mantel or console table.
Consistency is what makes these look store bought. Sand every piece smooth, use the same stain on all of them, and keep your gaps even. Sloppy spacing says “craft night.” Clean spacing says “boutique.”
3. Pallet wood wall Christmas tree

If you’re short on floor space, a pallet wood wall tree gives you the holiday mood without taking up a single square foot. Arrange the boards in a triangle, nail them to two vertical supports, and hang string lights and small ornaments right on the slats.
One warning: not every pallet belongs in your living room. Look for the “HT” stamp, which means the manufacturer treated the wood with heat instead of chemicals. The International Plant Protection Convention sets the standard for these markings, and you want to steer clear of anything stamped “MB” (methyl bromide).
4. Wooden bead garland

Remember when tinsel ruled the world? We’ve moved on. A wooden bead garland gives your tree soft texture without the sparkly chaos. Craft stores sell bags of unfinished beads for a few dollars, and you can string a full garland in one decent Netflix episode.
- Mix bead sizes so the garland looks more organic and less mass produced
- Tie tassels on the ends with leftover yarn
- Dip a few beads in white paint for a subtle two-tone effect
IMO, nothing else makes a cheap tree look curated this easily. Drape it loosely, not tight like a belt.
5. Log candle holders

Take a chunky log, drill a few shallow holes with a Forstner bit, and drop in LED tea lights or taper candles. A fancy home store would charge you $60 for something like this, and yours costs a drill bit and an afternoon.
A quick safety note, because I care about your eyebrows: wood burns. If you use real flames, set them in glass inserts or metal cups, and never leave them unattended. The National Fire Protection Association reports a spike in home candle fires every December, so I’d go with flameless LED candles. They give you the same glow without the risk.
6. Wooden ladder stocking display

You don’t need a mantel to hang stockings. Lean a simple wooden ladder against the wall and hang a stocking from each rung. You can build one from two long boards and some dowel rods, or pick up an old one at a thrift store.
Wrap the side rails in faux greenery and a strand of fairy lights. Now you have a focal point that looks intentional instead of “well, we didn’t have a fireplace, so…”
7. Wooden crate centerpiece

A shallow wooden crate makes a great base for a holiday centerpiece. Fill it with pinecones, evergreen clippings, a few candles, and some cinnamon sticks. It smells amazing, it looks rustic but polished, and it costs next to nothing.
Make it look aged in 10 minutes
Soak a pad of fine steel wool in white vinegar overnight, then brush the solution onto raw wood. The wood reacts and turns a weathered gray-brown within minutes. Woodworkers have used this trick for ages, and it makes brand new pine look like reclaimed barn wood.
If you love this foraged, natural look, you’ll want to check out these woodland Christmas decor ideas that turn your home into an enchanted forest.
8. Hand-lettered wooden signs
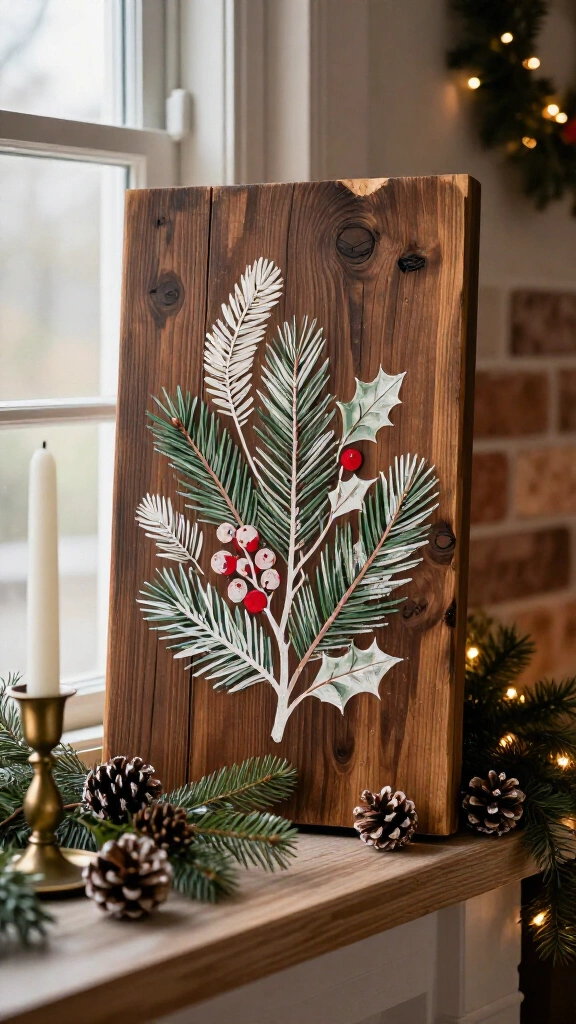
A store-bought “Merry & Bright” sign costs $40, and every one of your neighbors already owns it. Make your own with a scrap board, some stain, and a paint pen. A personalized sign with your family name or a line from your favorite carol feels more special anyway.
- If you don’t trust your handwriting, print your design, rub pencil graphite on the back, and trace it onto the wood
- For crisp letters, use a cheap stencil and a foam pouncer
- For a vintage feel, lightly sand over the paint once it dries
These signs look fantastic outside, too. Lean one by the door alongside these front porch Christmas decor ideas DIY lovers can pull off in a weekend.
9. Twig and driftwood stars

Go for a walk, collect five fairly straight sticks, and hot glue or tie them into a five-point star. The whole project takes about ten minutes. Hang the star on your front door or above the bed, or put it on top of the tree.
Driftwood takes this up a notch with its silvery, sun-bleached color. Weave a strand of warm white micro lights around the frame and you’ll have a glowing star that looks like it came out of a high-end catalog.
10. Dowel rod advent calendar

Hang a sturdy branch or dowel rod on the wall, then tie 24 strings of different lengths to it. Clip a small kraft paper envelope or muslin bag to each string with a mini wooden clothespin. Number them with a stamp or a wood-burned tag.
Kids love this, and adults secretly do too. FYI, you can fill the bags with tiny treats, handwritten notes, or daily activities like “make hot cocoa.” In my experience, experiences beat clutter every time.
11. Hanging branch chandelier

This one gets the most “wait, you MADE that?” reactions. Hang a long, interesting branch horizontally above your dining table with clear fishing line or twine. Then dangle wood slice ornaments, mini bells, and fairy lights from it at different heights.
Anchor it to a ceiling hook rated for the weight, and keep everything a few inches above eye level so your guests can still see each other across the table. If you have a round table, pair this with these round dining table Christmas decor ideas that make small spaces feel festive.
12. Fence picket tree collar
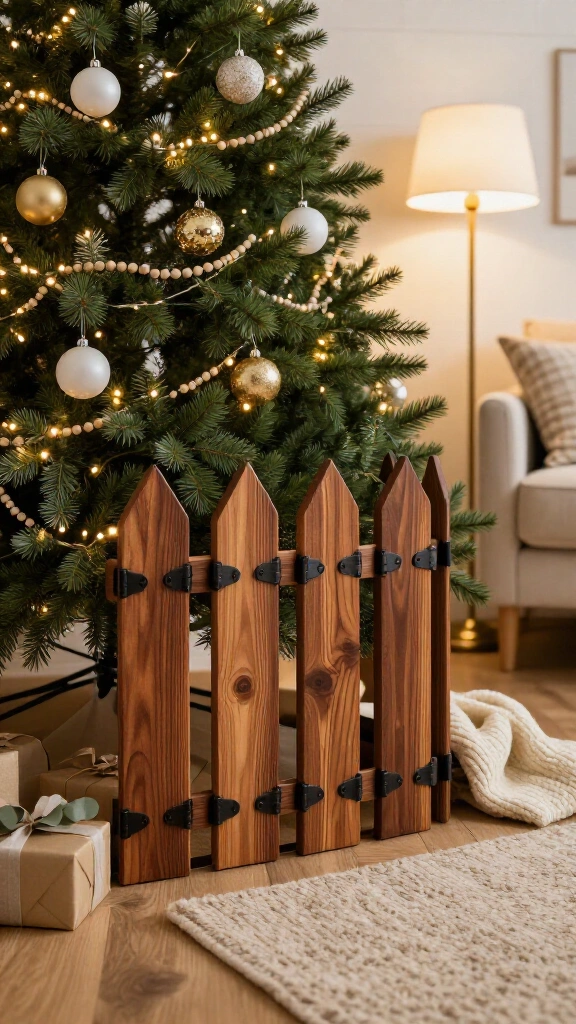
Online shops sell tree collars for $50 to $150. Fence pickets cost a couple of bucks each at the hardware store. You can probably guess where I’m going with this.
Cut four pickets per side, screw them together into four panels, and hinge or bracket the corners so the collar wraps around your tree stand. Stain it a warm walnut, or whitewash it if you want a Scandi feel. It hides that ugly plastic stand and makes a $30 tree look like a $300 one.
13. Mini wooden Christmas village

Cut small house shapes from a 2×4 (just a rectangle with an angled roof) and paint them white, cream, or soft gray. Draw tiny windows and doors with a fine-tip paint pen. Line them up on a shelf with bottle brush trees and a dusting of faux snow.
You end up with a charming Scandinavian-style Christmas village that holds its own against anything in a boutique window. If you want wood from responsibly managed forests, look for lumber with the Forest Stewardship Council label. Decorating sustainably feels good, too.
Final thoughts: expensive looks on a tiny budget
Wood looks expensive because it’s real. You don’t need fancy tools or a designer’s budget. You need a few branches, some scrap boards, decent sandpaper, and a little patience.
Here’s a quick recap of what makes DIY wooden decor look high-end:
- Sand everything smooth, because rough edges look cheap
- Stick to one finish across all your pieces
- Repeat materials like jute, greenery, and warm lights from room to room
- Group items in odd numbers so they look styled
- Put safety first by choosing heat-treated pallets and flameless candles
Pick one or two projects this weekend and start small. Before long, your friends will ask where you bought everything, and you’ll get to say, “Oh, this? I made it.” I can’t think of a better holiday feeling than that.