Every October, I catch myself humming “What’s This?” while staring at rows of dull orange plastic pumpkins. Generic supermarket decor bores me. Tim Burton’s universe gives us much weirder, wilder material to work with. You do not need to buy mass-produced plastic when you can build the crooked world of Halloween Town with your own hands.
Plug in your glue gun and dig out some scrap supplies. These 13 DIY Nightmare Before Christmas decor ideas will turn your living room into Jack Skellington’s home turf before Halloween arrives.
1. Life-Sized PVC Jack Skellington

Nothing marks your front door quite like the Pumpkin King standing eight feet tall. Skip the expensive retail animatronics. You can assemble a tall skeleton frame using three-quarter-inch PVC pipe and a handful of slip elbow fittings from your local plumbing aisle.
Carve Jack’s grin into a smooth foam pumpkin or coat a paper-mâché globe in plaster. Dress the frame in an oversized black suit from a thrift shop, then trace thin white pinstripes with a fabric paint pen. Cut his bat bow tie from black craft foam, backing it with floral wire so the wings keep their shape.
Pro Building Tips
- Slide two concrete bricks into the shoes to anchor the frame against autumn wind.
- Tilt his neck sideways to give him that curious, questioning posture from the film.
- Read basic PVC framing diagrams on Instructables before you start cutting pipe.
2. Sally’s Deadly Night Shade and Frog’s Breath Potion Jars

Sally’s kitchen experiments offer great inspiration for a countertop setup. Save your empty pickle jars, mustard jars, and syrup bottles instead of throwing them into the recycling bin. Odd shapes work best here.
Brush the exterior glass with a dirty wash of black and brown acrylic paint to simulate years of spilled kitchen ingredients. Write labels for “Deadly Night Shade,” “Frog’s Breath,” and “Worm’s Wort” on scrap paper stained with cold coffee. Drop a battery-powered green tea light into the Frog’s Breath jar to cast an oily green beam across the counter.
This project costs almost nothing and fills up an entire shelf in twenty minutes. You can group these bottles alongside our other Nightmare Before Christmas decor ideas to build a full tabletop display.
3. The Iconic Man-Eating Wreath

Give your front door real fangs this year. Grab an artificial evergreen wreath from a craft store. Pull the synthetic pine needles forward and outward in messy clumps so they look like ragged green fur.
Cut two dozen long, sharp teeth out of high-density EVA foam and press them deep into the inner ring with hot glue. Slice two yellow plastic ping-pong balls in half, draw vertical slit pupils on each with a permanent marker, and mount them near the top. Finish the mouth with a thick red velvet bow pinned between the lower jaws.
Mount the creature right at eye level on your front door. Delivery couriers will pause before touching your doorbell.
4. Glowing Zero the Ghost Dog Yard Prop
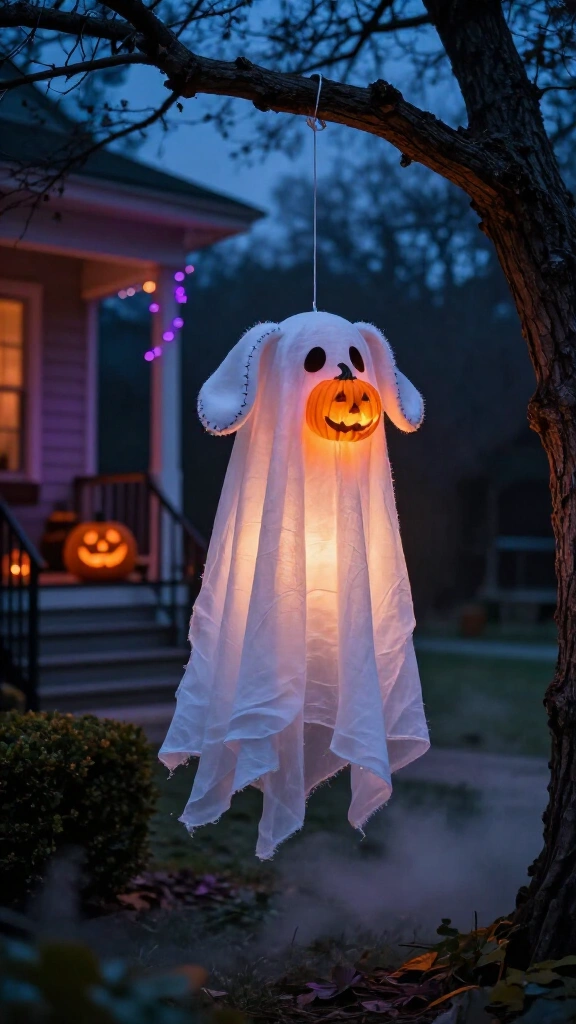
Jack’s ghostly dog makes a sweet, spooky addition to a front porch or garden hedge. You can build Zero’s head by wrapping lightweight cheesecloth over a small craft foam ball.
Cut floppy hound ears from white craft felt and run a strand of thin floral wire along each seam so you can shape them. Layer yards of sheer white fabric behind the skull to create his rippling sheet body. For the nose, wire a battery-operated orange LED pumpkin light directly to the snout.
Tie the ghost to a tree branch with transparent nylon fishing line. When the evening breeze picks up, Zero bobs through the air on his own.
5. The Mayor’s Dual-Faced Spinning Centerpiece

The town mayor brings nervous energy to any dinner table with his rapidly shifting moods. You can build a rotating centerpiece that displays his wide grin on one side and his panicked grimace on the other.
Start with a round shipping tube or stack two empty oatmeal cartons end to end. Paint his rosy, cheerful face on the front, then spin the cylinder around and paint his pale spider-webbed frown on the back. Glue a tall black cardstock top hat to the top lid, and pin a plastic spider to his printed ribbon badge.
Set the cylinder on an inexpensive rotating spice rack so guests can flip his mood whenever the conversation changes.
6. Spiral Hill Cardboard Silhouette Backdrop

That curling peak silhouetted against the harvest moon remains one of the most recognizable shots in modern stop-motion history. You can recreate the hill against an indoor wall with leftover delivery boxes and a can of flat black paint.
Draw the hill’s sweeping curl across flattened cardboard sheets, slice along your lines with a fresh utility blade, and coat the cardboard in matte black acrylic. Position a yellow paper lantern or a small warm floor lamp behind the cutout to throw a circular moon glow against your wall. Cut out five or six crooked cardboard gravestones and prop them at the base.
This large cutout gives party guests a ready-made backdrop for Halloween photos.
7. Oogie Boogie Burlap Sack Luminary

The shadow villain of Halloween Town looks best when you use rough, tactile textures. You can assemble Oogie Boogie quickly using cheap packing materials.
Pick up basic rough burlap at Michaels or a local fabric counter. Stitch two sack shapes together with thick black yarn, pulling the stitches unevenly to mimic his coarse patchwork seams. Fill his belly with crumpled newspaper until he looks thick and lumpy.
Cut his slit eyes and crooked mouth out of the front layer, then glue black mesh behind the openings. Drop an ultra-bright green battery utility light inside so the sack glows bright green on your porch steps.
8. Scary Teddy and Killer Duck Floor Display

The twisted Christmas gifts that Jack’s crew delivers make hilarious decorations. You can put together both the striped vampire teddy bear and the wheeled wooden duck in one afternoon.
Take a scruffy stuffed bear from a thrift store and paint broad black-and-white bands across its fur with acrylic fabric paint. Stitch a jagged felt smile across its snout and glue black craft foam wings to its shoulder blades. Next, grab a cheap wooden toy duck, paint it bright yellow, and add sharp painted teeth alongside fake bullet holes.
Place these two unruly toys under a black artificial pine tree. To explore more ideas for mixing holidays across your home, take a look at our Halloween Town room styling guide.
9. Halloween Town Giant Countdown Clock

Keep track of the remaining days until the holiday with the town square’s giant wooden counter. The moving hands give your living room an interactive element that kids love adjusting.
Cut a tall scalloped arch out of foam core board or thin plywood. Paint numbers around the outer ring with crackle medium to produce real peeling-paint textures. Mount two wooden pointer hands cut like skeletal fingers on a brass split-pin fastener so they turn freely.
Mount the clock over a fireplace mantel or in your front hallway where visitors can track the days.
10. The Haunted Snake Garland Staircase Wrap

Turn your stair banister into the giant striped python that swallows packages under the tree. This project fills empty vertical space with a bold, graphic prop.
Collect several pairs of black-and-white striped knee socks, or sew long tubes of striped fabric, then pack them tight with polyester stuffing. Join the sock sections with hidden zip ties to build a fifteen-foot creature. Form the wide head out of wire mesh wrapped in newspaper strips and glue, then wedge a fake wrapped gift directly between its teeth.
Spiral the completed serpent down your banister rail, weaving a strand of purple fairy lights between its coils.
11. Lock, Shock, and Barrel Trick-or-Treat Bathtub

Skip the ordinary plastic bowl and hand out candy from the mischievous trio’s motorized clawfoot tub. This setup turns candy duty into theater.
Find an oval plastic storage tub or an old utility washbasin. Coat the sides in off-white spray paint, then rub raw umber paint along the seams to create water stains and rust. Cut four curved bird claws out of rigid insulation foam and glue them under each corner of the tub.
Styling the Tub
Hang Lock, Shock, and Barrel’s devil, witch, and skeleton masks over the rim. Fill the tub to the brim with candy bars and drop in a small mist maker for an active fog effect when neighborhood kids walk up the driveway.
12. Floating Harlequin Demon Wall Cutouts

Need to fill an empty corridor or staircase wall? The Harlequin Demon, with his ring of head tentacles and round grinning face, adds instant Tim Burton style to flat drywall.
Project or sketch character shapes onto heavy illustration board, cut out the silhouettes, and paint them with matte craft paints. Outline every feature with thick black ink markers to echo the scratchy line work of original concept sketches. Stick thick foam mounting squares to the back of the cardboard before pressing it to the wall.
The small gap between the cutout and your wall casts natural drop shadows under indoor hallway lighting.
13. Sandy Claws Giant Spider Web Fireplace Mantel

Anchor your living room decor by turning your fireplace into a tangled gothic hearth. Trade thin store-bought poly-webbing for heavy architectural yarn nets.
Tie thick black macramé rope or chunky wool yarn into wide spider webs across your fireplace brick. The guides at The Spruce Crafts explain macramé knotting techniques that hold steady year after year. Tuck cut paper snowflakes, dead pine branches, and twisted silver twigs into the strands along the mantel shelf.
Light a row of red pillar candles along the hearth to send sharp shadows climbing up the brickwork.
You do not need a film studio budget or special prop-making training to build Halloween Town in your living room. Cardboard, thrift shop finds, and basic hardware supplies give you everything necessary to recreate Jack Skellington’s world. Pick one project from this guide, clear off your work table, and start making your props this weekend.