Your Christmas tree doesn’t need a Pottery Barn price tag to look like it belongs in a magazine spread. Some of the most jaw-dropping, “where did you GET that?” ornaments and accents start with a hot glue gun, a little creativity, and about $12 worth of craft supplies. I’ve spent years experimenting with DIY Christmas tree decor, and I can tell you firsthand: the homemade stuff often looks MORE luxurious than the store-bought alternatives.
Whether you’re decorating on a budget or you just love the satisfaction of making something beautiful with your own hands, these 14 DIY Christmas tree decor ideas will transform your tree from “nice” to “wait, did you hire a designer?”
1. Velvet Ribbon Cascades

Nothing screams luxury quite like velvet ribbon winding through your tree branches. Grab some wired velvet ribbon in deep burgundy, emerald, or champagne gold. You can find gorgeous options at JOANN Fabric and Craft Stores. Weave it vertically through your tree in a cascading waterfall effect.
The trick? Don’t cut it into perfect bows. Instead, let it flow organically from top to bottom, tucking it into branches every 12-18 inches. This creates depth and movement that makes your tree look professionally styled. A single 10-yard roll typically costs under $8 and covers the entire tree.
2. DIY Gold Leaf Ornaments

Take cheap clear or matte ornament balls and apply gold leaf sheets with adhesive sizing. The result? Ornaments that look like they cost $25 each instead of the $3 you actually spent. The imperfect, organic pattern of gold leaf gives them an artisan quality you simply can’t replicate with spray paint.
You can also try this technique with copper or silver leaf for different vibes. Pro tip: seal them with a matte clear coat so the leaf doesn’t flake off over the years. I made a set of 12 three years ago, and they still look fantastic.
3. Dried Orange Slice Garland

This one’s a classic for a reason, and it’s having a MAJOR comeback thanks to cottagecore and Scandinavian design trends. Slice oranges thin (about 1/4 inch), bake them at 200°F for about 2-3 hours until dried, and string them on twine or thin ribbon.
The warm amber glow they create when tree lights shine through them is absolutely magical. They also smell incredible and pair beautifully with cinnamon stick bundles. If you love the natural aesthetic, you’ll also want to check out these woodsy Christmas tree ideas that turn your living room into a winter forest.
4. Faux Mercury Glass Ornaments

Real mercury glass ornaments can run you $15-40 PER ornament. The DIY version? Under $2 each. Here’s the secret: spray the inside of clear glass ornaments with a mixture of looking glass spray paint and water. Spritz water first, then spray the paint. The water creates those coveted mottled, antique-looking spots.
Let them dry, give another light coat, and you’ve got ornaments that look like heirlooms passed down from your very stylish grandmother. Group them in clusters of three to five on your tree for maximum visual impact.
5. Wooden Bead Garland

Forget the cheap plastic garlands from the dollar store. Wooden bead garlands give your tree that elevated, curated look that interior designers love. You can buy raw wooden beads in bulk online and string them yourself. It’s practically meditative.
Want to take it up a notch? Paint every third bead metallic gold or dip the ends in white paint for a modern, Scandinavian feel. A 9-foot strand costs about $5 to make versus $20-30 for a similar store-bought version. These also look gorgeous draped across a mantel when the season’s over.
6. Cinnamon Stick Star Ornaments

Five cinnamon sticks, some hot glue, and a piece of twine. That’s literally all you need to create rustic star ornaments that look like they came from an artisan holiday market. Arrange the sticks into a star shape, secure with glue at each joint, and add a loop of jute twine for hanging.
You can leave them natural or add a light dusting of gold glitter at the tips for extra sparkle. These work especially well on trees with warm white lights and earth-toned color schemes. Plus, they make your whole living room smell like a holiday bakery.
7. Pinecone Ornaments with Faux Snow
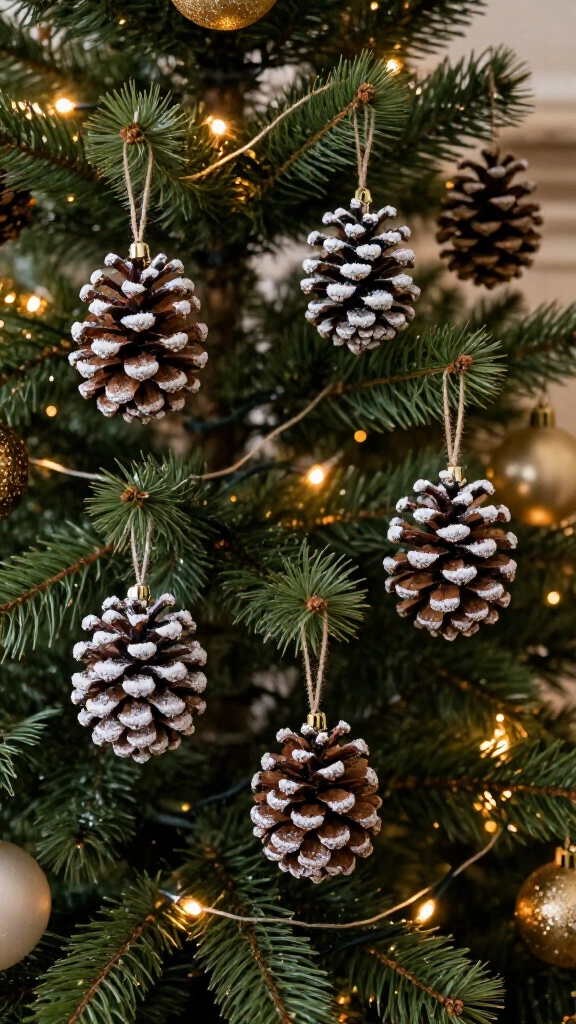
Gather pinecones from your yard (free!), attach a small eye hook to the top, and dust the tips with white acrylic paint or faux snow spray. The contrast between the dark brown pinecone and the frosted white tips creates an expensive, designer look that honestly rivals anything from Restoration Hardware.
For extra polish, dip the very tips in Mod Podge and then into fine white glitter. Hang them at varying depths in your tree to create dimension. According to Better Homes & Gardens, layering natural elements at different depths is one of the top secrets professional decorators use.
8. DIY Felt Ball Garland

Felt ball garlands are EVERYWHERE in high-end holiday catalogs, and retailers charge $40+ for a single strand. You can make your own for a fraction of that. Buy wool felt balls in a coordinated color palette (think blush, cream, sage, and gold) and string them on embroidery thread using a large needle.
The secret to making it look expensive is choosing a limited, sophisticated color palette instead of going full rainbow. Three to four complementary colors keep things cohesive. Space each ball about an inch apart for that perfectly imperfect, handcrafted aesthetic.
9. Monochromatic Paper Ornaments

Here’s where minimalism meets maximum impact. Using heavy cardstock or watercolor paper in a single color (white is gorgeous), create 3D paper ornaments: geometric shapes, honeycombs, or layered snowflakes. When you go monochromatic, even simple paper crafts look incredibly intentional and high-end.
There are tons of free templates available on sites like Martha Stewart’s website that you can print and fold. An entire set of white paper ornaments against a green tree with warm lights? It looks like something straight out of an Architectural Digest holiday feature. In my opinion, this is one of the most underrated DIY Christmas tree decor ideas out there.
10. Eucalyptus and Greenery Picks

Fresh or faux eucalyptus sprigs tucked into your Christmas tree branches add that “professionally decorated” quality instantly. The silvery-green color of eucalyptus creates beautiful contrast against traditional dark green trees, and the organic shapes break up the uniformity of ornaments.
Buy a bundle of faux eucalyptus stems (real ones dry out quickly), cut them into 6-8 inch picks, and tuck them throughout the tree. This gives that lush, layered look you see in designer homes. Love the idea of bringing nature indoors? These autumn Christmas tree ideas that make fall colors last through Christmas take a similar approach with gorgeous seasonal foliage.
11. Chunky Knit Mini Stockings

Even if you’re not a knitter, you can make tiny chunky knit stockings to hang as ornaments. There are beginner-friendly loom-knitting tutorials all over YouTube that make this surprisingly easy. Use chunky yarn in neutral tones (cream, taupe, soft gray) for that cozy-meets-luxe look.
Each mini stocking takes about 20-30 minutes once you get the hang of it. Fill them with a tiny sprig of faux berries or a small candy cane for extra charm. Scatter 6-8 of these throughout your tree, and people will absolutely assume you bought them from an Etsy shop for $15 a pop.
12. Twig and Branch Tree Topper

Ditch the standard star or angel and make a sculptural twig tree topper instead. Gather thin, flexible branches or birch twigs, shape them into a loose starburst or asymmetric arrangement, and secure them with floral wire. You can leave them natural or spray-paint them gold or white.
This kind of organic, architectural topper gives your tree an editorial, designer look that no mass-produced topper can match. It’s the kind of detail that makes people stop and say, “Okay, THAT is gorgeous.” The slight imperfection is what makes it look expensive. Ironic, right?
13. Wax Seal Ornaments

This trend has been blowing up, and for good reason. Wax seal ornaments look ridiculously elegant and cost almost nothing to make. Melt sealing wax onto parchment paper in a circle, press a decorative stamp into it (snowflakes, initials, pine trees), and poke a hole near the top before it fully hardens.
Thread ribbon through the hole, and you’ve got ornaments that look like antique treasures. The deep jewel tones of traditional sealing wax (burgundy, forest green, navy) add richness to any tree. Make a batch of 15-20 in an evening while watching holiday movies. It’s basically self-care that doubles as decor.
14. Fabric Scrap Bow Clusters

Instead of buying pre-made bows (which can look cheap and stiff), create handmade bow clusters from fabric scraps. Linen, burlap, silk dupioni, or even old plaid shirts work beautifully. Cut strips about 2 inches wide and 12-18 inches long, tie them into loose, organic bows, and attach them to branches with floral wire.
The texture mix of different fabrics creates visual interest that you simply cannot buy off a shelf. Layer two or three different fabrics per bow for extra dimension. These handmade fabric bow clusters make your tree look like a professional styled it, and they cost literally pennies if you’re using scraps you already have.
Bonus Styling Tip
Once you’ve made your DIY ornaments, here’s the number one rule for making your tree look expensive: layer in threes. Group similar ornaments in clusters of three at varying depths. Place one near the trunk, one mid-branch, and one near the tip. This creates that designer-level dimension that separates a “decorated tree” from a “STUNNING tree.”
Wrapping It All Up
Here’s the beautiful truth about these 14 DIY Christmas tree decor ideas that make your tree look expensive: the handmade quality is actually what GIVES them that luxury feel. Mass-produced perfection reads as cheap. Artisan imperfection reads as high-end. Funny how that works.
You don’t need to tackle all 14 ideas. Pick three or four that match your style, commit to a cohesive color palette, and watch your tree transform into something that looks like it belongs in a holiday catalog. The best part? When someone asks where you got your gorgeous ornaments, you get to casually say, “Oh, I made those.” That feeling is priceless.
So grab your glue gun, pour yourself some hot cocoa, and start crafting. Your most beautiful Christmas tree is waiting to happen, and your wallet is going to thank you.