Homeowners looking at a bathroom remodeling quote usually hit sticker shock when they read the tile labor line item. A common thought follows: I can buy ceramic tile for two dollars a square foot, watch a couple of video tutorials over the weekend, and save three thousand dollars in labor. In practice, tile installation is a rigid trade that punishes small mistakes. If you make an error painting a wall, you roll another coat over it. If you make an error installing floor tile, the surface cracks underfoot four weeks later. You end up taking a sledgehammer to the floor and starting over from the subfloor. That is the real hidden cost of a DIY install.
A Real Job Site Failure: The $2,800 Lesson
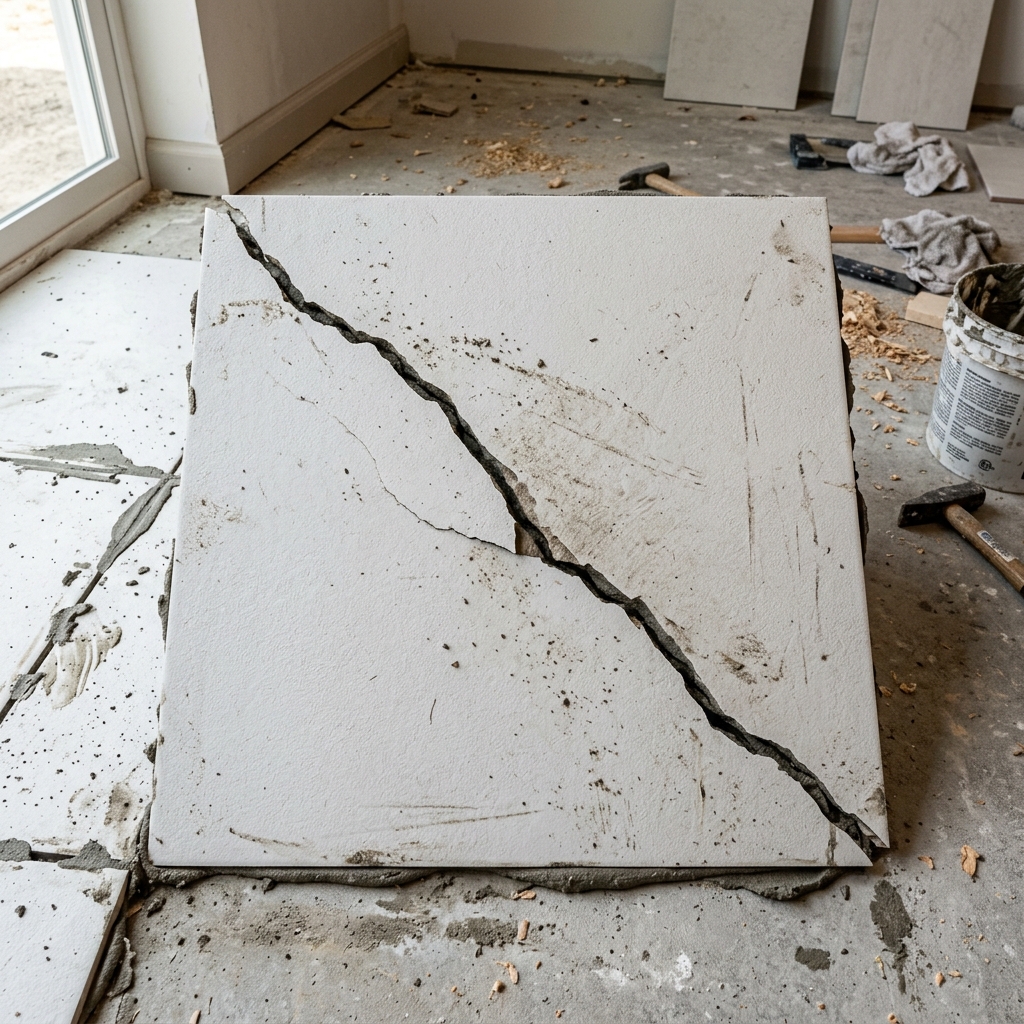
In late 2025, a client in Boston called me to inspect a master bathroom floor they had tiled themselves. They had purchased 12-by-24-inch porcelain tiles. Because they skipped subfloor leveling and used an improper quarter-inch trowel, mortar coverage under the tiles was under 50 percent. Massive air pockets sat beneath the surface. On a cold morning in November, three tiles snapped straight down the center under normal foot pressure. Demolishing the cracked floor, buying fresh porcelain, pouring self-leveling underlayment, and paying a professional crew to rebuild it cost $2,800. Their initial attempt to save $1,500 on labor resulted in a net loss.
The Subfloor Deflection Trap
Standard material budgets list tile, grout, and a single bag of mortar. They ignore the structural preparation required underneath. You cannot stick rigid tile directly onto a flexing wood subfloor. According to TCNA guidelines, subfloor deflection must not exceed L/360 for ceramic tile or L/720 for natural stone. If your floor joists bounce when you jump, grout lines will crumble within days.
Fixing a bouncy floor requires cement backer board or an uncoupling membrane like Schluter Ditra. A roll of uncoupling membrane runs around $150 to $200. You also need unmodified thinset to bond the membrane to the plywood subfloor. Before opening a single box of tile, your prep materials can easily cross $300.
For uneven concrete, self-leveling underlayment is mandatory. At $40 per 50-pound bag, a medium bathroom with a half-inch slope across six feet will take five to six bags. Skipping this step leaves sharp tile edges sticking up, a defect known as lippage that catches bare feet and ruins the finish.
Thinset Math and Proper Trowel Notch Sizing
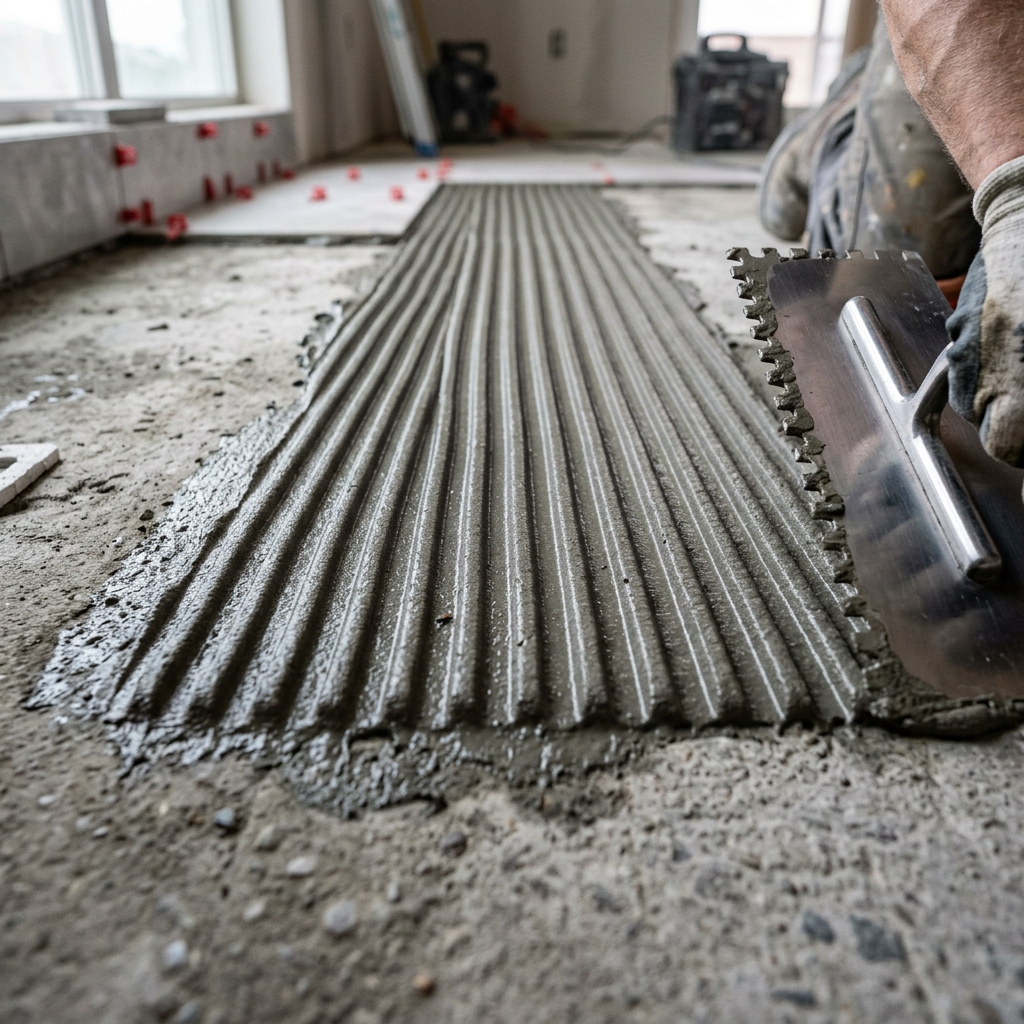
Spreading thinset mortar is not like spreading glue. You must comb the mortar using a notched trowel to create straight directional ridges. Pressing the tile down collapses these ridges into a flat, void-free bed. Using a trowel with small notches on large tiles leaves hollow spots. Using notches that are too large forces wet mortar up through grout joints.
Large-format tiles require a half-inch square-notched trowel or a slant-notch trowel, plus back-buttering the reverse side of every tile. A 50-pound bag of mortar covers about 35 to 40 square feet when back-buttering. Beginners routinely buy two bags for a 100-square-foot room and run out halfway through the job. Running back to the store while thinset dries on your floor creates weak cold joints.
Tool Rental and Specialty Hardware Expenses
You cannot cut dense porcelain with a manual snap cutter. You need a wet tile saw equipped with a diamond continuous-rim blade. Renting a commercial wet saw costs roughly $65 per day. Because DIY installs move slowly over weekends, four days of rental fees equal $260, which is near the cost of buying a basic saw.
You also need diamond hole saws for shower valve cutouts ($45), a heavy-duty mixer paddle ($25), tile leveling clips and wedges ($60), and a margin trowel ($15). The specialty tool stack routinely adds $400 to your overall budget.
Step-by-Step DIY Budgeting Calculation Guide
To avoid surprise expenses, build your material estimate using this step-by-step method:
- Step 1: Calculate net square footage by multiplying length by width. Subtract built-in features like tubs or cabinet bases.
- Step 2: Add waste factor. Use 10% for straight layouts, 15% for diagonal layouts, and 20% for herringbone patterns.
- Step 3: Calculate underlayment needs. Add one bag of self-leveling compound for every quarter-inch of floor slope per 30 square feet.
- Step 4: Calculate thinset mortar. Budget one 50-pound bag for every 35 square feet of large-format tile.
- Step 5: Budget specialty tools. Include wet saw rental, leveling clips, diamond hole bits, and waterproofing membranes.
Common Mistakes That Destroy DIY Budgets
Four recurring mistakes ruin DIY tile projects and inflate costs:
- Swirling thinset ridges: Combing thinset in semi-circles traps air bubbles under the tile. Always comb in straight parallel lines.
- Grouting too early: Applying grout before thinset cures completely (24 hours) traps moisture, causing grout discoloration and weakness.
- Skipping expansion joints: Tiling tight against walls without leaving a quarter-inch gap causes tiles to tent and pop off the floor during summer humidity changes.
- Using premixed mastic in wet areas: Organic premixed mastic softens when exposed to water. Always use cement-based thinset for shower floors and bathroom surfaces.
Frequently Asked Questions About DIY Tile Budgeting
How much extra tile should I buy for waste?
For standard grid layouts, buy 10 percent extra. For diagonal patterns, buy 15 percent extra. If you are tiling a small bathroom with complex cuts around pipes and doorways, order 20 percent extra. Always save one full box of matching tile dye-lots for future repairs.
Can I install new tile over existing tile?
Tiling over tile is possible only if the original subfloor is solid, the old tile is firmly bonded, and you scarify the old glazed surface with an angle grinder. However, it raises the floor height by half an inch, requiring door trimming and transition strips.
What thinset should I use for porcelain tile?
Use a polymer-modified thinset meeting ANSI A118.4 or ANSI A118.11 standards. Standard unmodified mortar does not bond well to non-porous porcelain.
Understanding ANSI Tile Mortar Specifications
Not all tile mortars are created equal. The American National Standards Institute (ANSI) establishes strict performance standards for cementitious mortars. Standard unmodified mortar (ANSI A118.1) relies purely on mechanical hydration to form a bond. When applied to impervious porcelain tiles with a water absorption rate under 0.5 percent, unmodified mortar fails to grip the glass-like back of the tile.
Porcelain requires polymer-modified mortar meeting ANSI A118.4 or ANSI A118.11 standards. Polymer additives create chemical cross-linking bonds that grip non-porous surfaces. Using modified thinset increases cost from $18 per bag to $38 per bag, but prevents tile delamination under heavy foot traffic.
Shower Waterproofing Systems: Liquid vs Sheet Membranes
Tiling a wet area like a shower floor or curb requires a continuous waterproof layer beneath thinset. Cement backer board is water-durable, meaning it will not disintegrate when wet, but it is not waterproof. Water passes straight through cement board and rots wall studs.
You must apply either a liquid elastomeric membrane (like Custom Building Products RedGard or Hydro Ban) or a bonded sheet membrane (like Schluter Kerdi). Liquid membranes require two thick coats applied at a wet film thickness of 30 mils. Applying a single thin coat leaves pinhole voids where moisture leaks into subfloors.
What grout width is best for large format tile?
For 12-by-24-inch or larger porcelain tiles, use a minimum 1/8-inch grout joint. Using tighter 1/16-inch joints on large tiles makes lippage impossible to feather out and violates TCNA installation standards.
How long must thinset dry before applying grout?
Allow thinset mortar to cure for a full 24 hours at room temperature (70 degrees Fahrenheit) before walking on tiles or applying grout. Grouting too early traps moisture under tiles, causing grout efflorescence and joint cracking.
Need to calculate measurements for your space?
Use our free interactive tool to calculate dimensions automatically.
Calculate Tile Costs →